Create Shipment
Last updated -
APC 123 offers three user-friendly options for creating shipments. Tailored to meet your specific needs, these options provide flexibility and efficiency in managing your orders.
Single Shipment
Leverage the power of automated processes by seamlessly integrating Shopify order data directly from the orders table. This not only saves you valuable time but also ensures accuracy by automatically pulling relevant data from your Shopify store, enabling you to create a single APC shipment with ease.
To create a single shipment please follow these steps:
- Navigate to the "Orders" section within the app.
- Identify the specific order you intend to ship.
- Click the + icon under the Single column for the corrosponding row.
- Review the selected order and make any necessary adjustments.
- Complete the process by clicking the "Create Shipment" button.
For more information check out our instructional video on how to create a single shipment in the Guides / Tutorials section.
Bulk Shipments
Boost your efficiency by creating multiple shipments simultaneously. Our system intelligently extracts relevant data from your Shopify orders, streamlining the entire process for unparalleled accuracy and time savings. Users also benefit from the option to review and make adjustments to order data before initiating the creation of bulk shipments.
Here's how to create multiple shipments simultaneously:
- Navigate to the "Orders" section within the app.
- Identify the specific orders you intend to ship.
- Select multiple orders using the checkboxes or by clicking the order ID.
- Upon selection, the create shipping labels dialog seamlessly emerges.
- Click the create shipping labels button to open the bulk shipments window.
- Review the selected orders and make any final adjustments.
- Click the create shipments button to complete the process.
For more information check out our instructional video on how to create bulk shipments in the Guides / Tutorials section.
Manual Shipment
Ideal for scenarios requiring manual data entry, such as orders received over the phone or in-store. This option provides flexibility for unique situations where manual entry is preferred.
Follow these steps to manually create a shipment:
- Locate the 'Create manual shipment' button within the app.
- Click on the button to initiate the manual entry process.
- Fill in the necessary shipment details, such as recipient information, package specifications, and shipping method.
- Click the 'Create Shipment' button to finalize.
For more information check out our instructional video on how to create a manual shipment in the Guides / Tutorials section.
Delivery Type
When initiating a shipment using any of the three methods outlined above, you have the flexibility to specify your preferred delivery type. This choice ensures that the shipment adheres to the predefined parameters for collection and delivery addresses set at the account level.
Choose from the following available delivery types:
Sender
This serves as the default option for creating shipments, utilizing the collection address associated with your APC account. By selecting this option, the collection address fields are disabled and automatically populated when creating a shipment.
Recipient
Choose this option when generating return shipments directed to your account's designated return address. This selection automatically disabled the delivery address fields and populates them during the shipment creation process.
Third Party
Allows customization of both the collection and delivery addresses, providing flexibility for specific shipping arrangements.
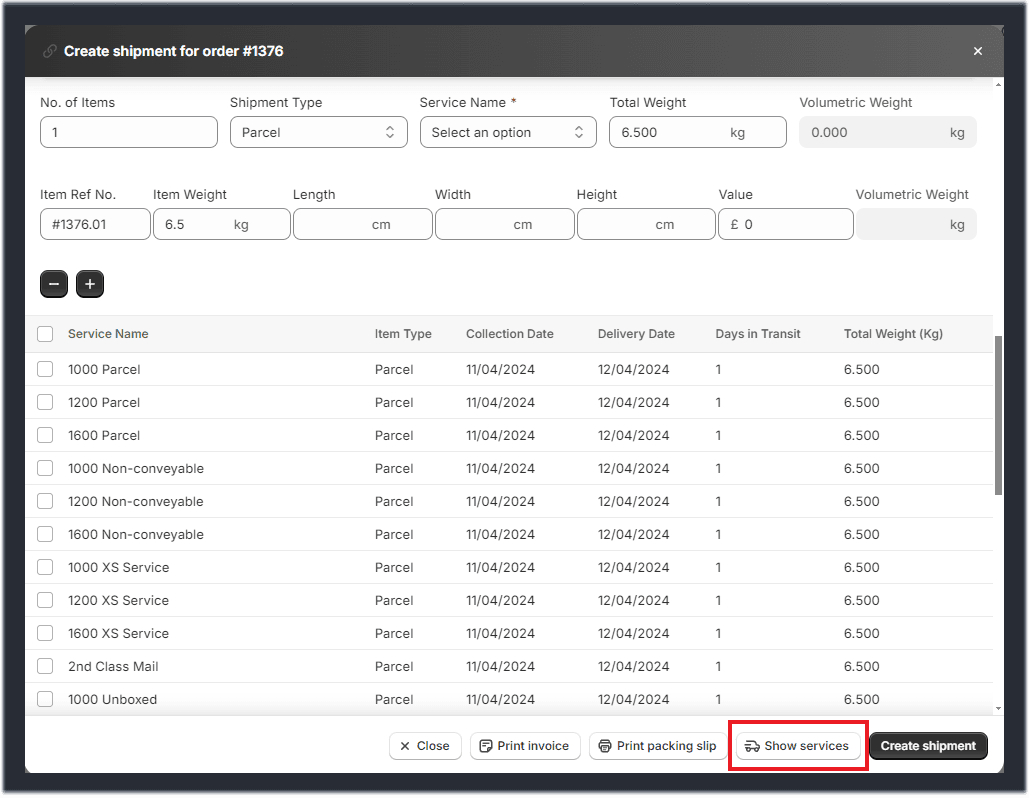
Show Services
The 'Show Services' button is a valuable feature that displays a list of all available APC services based on the shipping information provided. It is visible when creating single, bulk or manual shipments and calculates available services using the following data:
- Collection postcode
- Delivery postcode
- Collection date
- Number of items
- Total weight
- Item weight
- Item dimensions
- Volumetric weight
Shipping Labels
Upon successful shipment creation, the shipping label or labels will be automatically generated in PDF format and promptly opened in a new browser tab, ready for printing.
For bulk shipments the same process applies with the most recent orders appearing first.
For more information check out our guide on how to print shipping labels in the Guides / Tutorials section.
Packing Slips
Easily print packing slips individually or in bulk as part of the shipment creation process. For customers on the Silver Subscription Plan, there's an added convenience - the option to enable automatic printing of packing slips. Once activated, this feature ensures that packing slips are automatically generated in PDF format alongside the shipping label and displayed in a separate tab, streamlining your shipping workflow.
Invoices
Invoices can also be printed individually or in bulk as part of the shipment creation process.
Custom Branding
Enhance the presentation of your printed documents by adding your company logo. Incorporating your logo adds a personalized touch to your packing slips and invoices, bolstering your brand identity across the entire fulfillment process. Check out the Company Logo section under settings to find out more.